Best Flight Sim Hardware for Beginners — Yoke, Throttle, and Pedals Guide
Finding the best flight sim hardware for beginners is genuinely harder than it looks. Not because the options are bad — there are actually some fantastic controllers at every price point right now — but because almost every review out there assumes you already know what you want. They compare yokes to other yokes, throttle quadrants to other throttle quadrants, and skip right past the question a new simmer is actually asking: what do I buy first? I started with a $30 USB joystick from a clearance bin in 2014 and have rebuilt my setup four times since. Here’s what I wish someone had told me before I wasted money on the wrong things in the wrong order.
Start Here — Joystick vs Yoke for Your First Setup
This is the single most important decision you’ll make, and most guides bury it three paragraphs down. A joystick and a yoke both control pitch and roll — the two axes that keep your plane flying straight. That’s where the similarity ends.
A joystick sits on your desk, takes up about the footprint of a coffee mug, and costs between $30 and $150 for a solid beginner model. A yoke — the two-handled steering wheel-style controller — mounts to the edge of your desk with a clamp, takes up real estate, and starts at around $250 for anything worth buying. More importantly, a yoke is designed to simulate the control column you’d find in a Cessna 172 or a Boeing 737. It’s the right tool for that job. But it’s a terrible learning tool if you’re not sure yet whether you want to fly propeller planes, fighters, airliners, or all three.
Start with a joystick. Full stop. Here’s why — joysticks work well for every category of aircraft in Microsoft Flight Simulator 2020, X-Plane 12, and DCS World. A Spitfire, a Dash 8, a Cessna, even a helicopter to some degree. A yoke is mechanically limited; it doesn’t rotate fully like a joystick does, which makes anything with a roll-heavy flight model feel awkward. Learned that one the hard way after buying a yoke before I knew I’d end up spending 60% of my sim time in warbirds.
The one exception: if you know with absolute certainty that you only want to fly airliners — 737s, A320s, the PMDG 777 — then a yoke makes sense as your first purchase. But if there’s any doubt at all, buy a joystick first. You can always add a yoke later once your simulator preference is locked in.
Budget Setup Under $150
Probably should have opened with this section, honestly — because for a lot of people, the budget question comes before anything else.
Two joysticks dominate this price range and have for years. The Logitech Extreme 3D Pro (street price around $40–50) and the Thrustmaster T.16000M (around $60–80 depending on where you shop). Both are genuine entry points into sim hardware, not toys.
Logitech Extreme 3D Pro
The Logitech Extreme 3D Pro has been on the market since roughly 2003, which sounds like a knock against it but really isn’t. It’s survived this long because it works. Twelve programmable buttons, a twist axis for rudder control (more on that later), and a throttle slider on the base. It’s asymmetric — designed for the right hand only — and the build quality is mostly plastic, but it handles plug-and-play setup on Windows without any driver drama. For $45, it’s a reasonable way to find out if flight sim is going to stick for you before committing to a deeper investment.
What you miss at this price: precision. The sensor is a basic potentiometer, not a Hall effect sensor, which means it can develop a center drift over time. Not immediately, but eventually. Also, the throttle slider on the base is awkward to use mid-flight. You’ll find yourself ignoring it.
Thrustmaster T.16000M
Spend an extra $20–30 and get the Thrustmaster T.16000M instead if your budget allows it. This one uses Hall effect magnetic sensors in the main stick axes, which translates to noticeably more precise center feel and longer hardware life. It’s ambidextrous — works for left- or right-hand use — and has 16 action buttons plus a four-way hat switch. Throttle is a separate unit on the base, slightly better positioned than the Logitech equivalent.
This is genuinely enough to learn on. You can log hundreds of hours in MSFS 2020 with a T.16000M and never feel held back by the hardware. The step up from here is a quality-of-life upgrade, not a necessity.
Mid-Range Setup — $150 to $400
Once you’ve confirmed that flight sim is a real hobby for you — not just a two-week obsession — this is where the noticeable jumps in quality and immersion happen. There are two paths depending on whether you’ve committed to airliners or general aviation and combat aircraft.
Thrustmaster TCA Officer Pack — Airbus Edition
Obsessed by the Airbus flight deck aesthetic, a lot of simmers gravitate toward this one quickly. The Thrustmaster TCA Sidestick Airbus Edition (around $60 on its own) is designed to replicate the feel of a sidestick controller like you’d find in an A320. It’s a side-mounted joystick that sits to the right of your keyboard rather than in front of you. Paired with the TCA Quadrant Airbus Edition (around $100), you get a proper throttle with detents for IDLE and TOGA positions — the specific click-stops that Airbus aircraft use. The two-piece set runs approximately $160 and is one of the best value combinations in sim hardware right now for anyone focused on Airbus aircraft in particular.
The throttle quadrant alone is worth the price. Those physical detents — you feel them click as you move through CLIMB, FLEX, and TOGA — add a layer of tactile feedback that no on-screen animation can replicate.
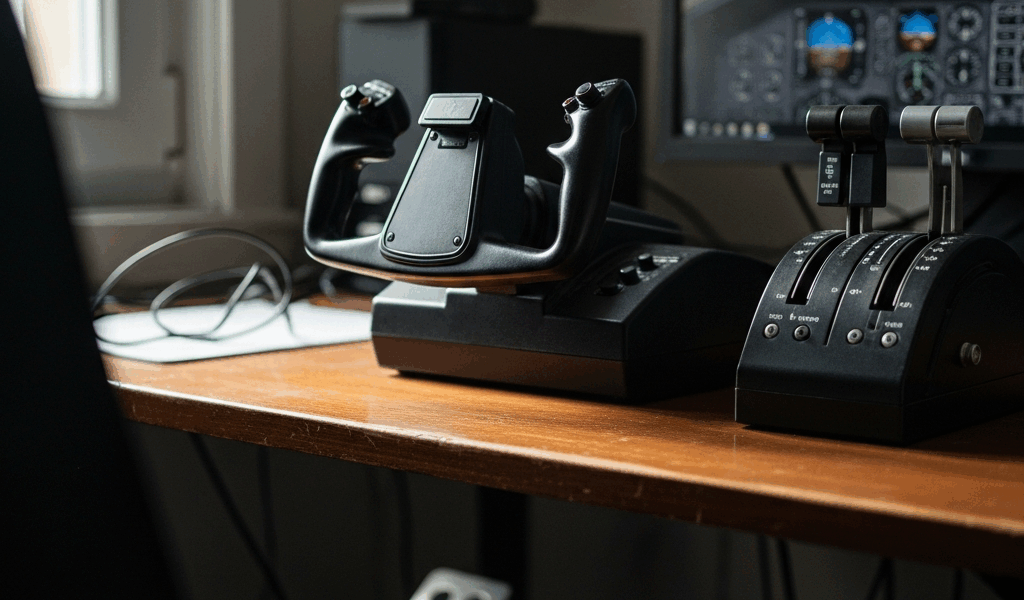
Honeycomb Alpha Flight Controls — Yoke
If you’ve decided airliner and general aviation flying is your thing and you want a yoke, the Honeycomb Alpha Flight Controls yoke (around $199–229) is where most experienced simmers point beginners with a mid-range budget. It clamps to desks up to about 2.3 inches thick, has a full 180-degree rotation, and includes a built-in throttle lever plus a panel of switches for landing gear, magnetos, and master electrical — things you’d actually use in a Cessna or Piper. Build quality is leagues above anything in the $40–80 range.
Pair the Honeycomb Alpha with the Honeycomb Bravo Throttle Quadrant (around $169) if you want a matched set. That combination — roughly $370–400 together — is genuinely competitive with hardware costing twice as much from manufacturers like Saitek/Logitech’s professional line.
Rudder Pedals — When to Add Them
Rudder pedals are not your first purchase. I want to be clear about that. If you’re working with a twist-axis joystick like the Logitech Extreme 3D Pro or the T.16000M, you already have rudder control — it’s the rotation of the stick itself. Imperfect, yes. But functional enough to land, taxi, and take off without issues.
Add rudder pedals when two things are true: you’ve put real hours into the sim, and the twist-axis feels like a limiting factor. For most people that’s somewhere around the 50–100 hour mark, assuming they’re pushing their flying rather than just cruising around.
Budget — Thrustmaster TFRP Rudder Pedals
The Thrustmaster TFRP T.Flight Rudder Pedals run about $60–70 and are the standard recommendation at the low end. Three-axis — rudder, left brake, right brake — which covers everything you need for general flight and differential braking on the ground. Build quality is plastic-heavy and the center spring tension is lighter than real pedals, but they work reliably and the price of entry is low enough that they don’t sting if you end up upgrading later.
Mid-Range — Logitech G Flight Rudder Pedals
The Logitech G Flight Rudder Pedals (around $100–130) are a step up in feel and adjustability. The heel rest is more natural, the pedal travel is longer, and the resistance feels more deliberate. They’re not a perfect simulation of actual aircraft rudder pedals, but for a desk setup they’re comfortable for long sessions. These hold up well alongside both the mid-range joystick setups and the Honeycomb yoke combination.
Pedals in this price range are genuinely satisfying. They don’t require rudder to be a twist motion of your wrist anymore, which frees up your hands to focus on throttle, trim, and the hundred other things happening in the cockpit during approach and landing.
What NOT to Buy First
Hardware manufacturers know beginners research hard before buying. Some of that marketing exploits enthusiasm in ways that waste real money.
Don’t build a full cockpit setup from the start. Full home cockpit builds — MDF enclosures, multi-monitor setups, replica overhead panels — are a years-long project for experienced simmers. Buying a replica 737 throttle stand before you know how to configure a STAR approach in MSFS is the sim hardware equivalent of buying a professional espresso machine before you’ve learned to make drip coffee. The complexity will kill your motivation before the hobby has a chance to hook you.
Track IR comes before VR, and both can wait. TrackIR — a head-tracking camera system that moves your in-sim view as you physically turn your head — costs around $150–200 and is legitimately one of the most immersive upgrades available. But it’s not a hardware replacement, it’s an immersion layer. VR headsets for sim use (Meta Quest 3, Valve Index) start at $300 and require a PC powerful enough to push the frames. Both are worthwhile eventually. Neither belongs in a beginner’s first purchase list.
Here’s a useful reframe — if you’re debating between rudder pedals and a head-tracking device as your next upgrade after a solid joystick, buy the head tracking first. TrackIR or the cheaper OpenTrack/Delanclip solution (around $60–80 for the clip-based version) will immediately change how flight simulation feels. Rudder pedals make you more precise. Head tracking makes you feel like you’re actually there. For a beginner still building enthusiasm for the hobby, immersion wins.
Don’t buy a multi-panel instrument cluster before you understand the systems. The Logitech/Saitek Pro Flight instrument panels look incredible in setup photos. They also require you to understand exactly what they’re displaying to get any value from them. Learn the sim first. The hardware will still be there.
The path forward is simpler than most forums make it seem: start with a joystick under $80, fly until you know what you like, then add hardware in the order that matches what’s actually limiting you. That’s it. Every experienced simmer who’s built a great setup did it that way — one piece at a time, with real hours behind each upgrade decision.


Stay in the loop
Get the latest ultimate flight simulators updates delivered to your inbox.