“`html
Saitek Pro Flight Yoke Not Working in MSFS — Here’s the Actual Fix
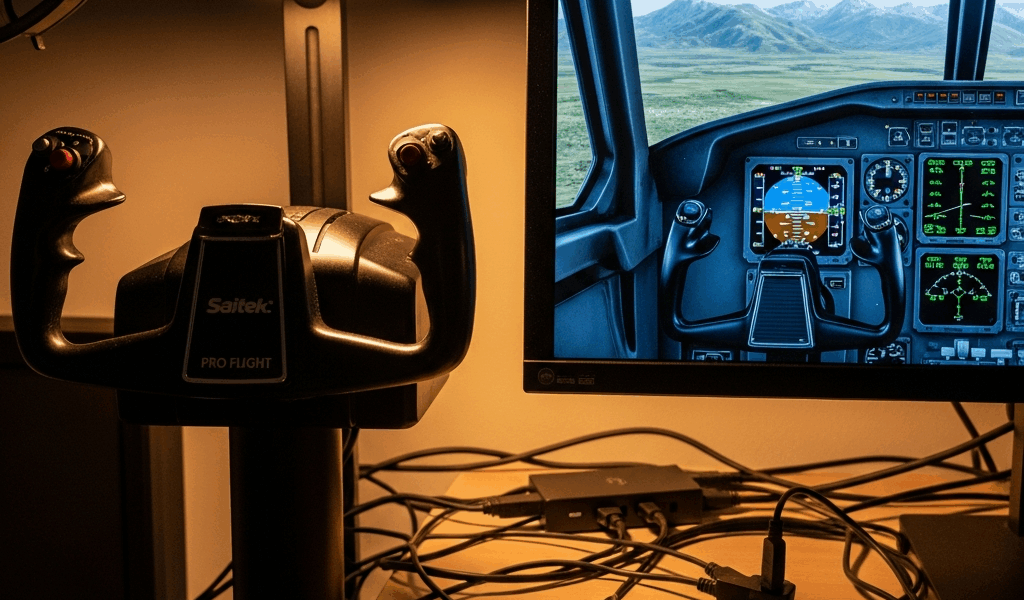
Flight sim troubleshooting has gotten complicated with all the outdated advice flying around. I’ve been using a Saitek Pro Flight Yoke for about eight years now, and when Microsoft Flight Simulator 2024 launched, mine just died mid-flight — pitch trim worked, nothing else. Spent three hours chasing generic “update your drivers” nonsense before I figured out what actually works.
Here’s the thing: thousands of users hit this exact problem every time a major sim update drops. The official troubleshooting steps? Almost never what you need. This isn’t about your yoke being broken. It’s about Windows 11 and 12 treating legacy USB devices completely differently than Windows 10 did, combined with how MSFS 2024 enumerates flight controllers on startup. I’m going to share the exact steps that brought mine back to life — including the USB hub fix nobody talks about.
Why Your Saitek Pro Flight Yoke Stops Responding
The root cause lives in three separate places. First, Saitek (acquired by Mad Catz back around 2017) stopped supporting the Pro Flight Yoke years ago. Windows 11 and 12 introduced stricter USB enumeration protocols — they changed how they ask devices to identify themselves. Your yoke’s driver was written for an older handshake protocol. Doesn’t match anymore.
Second, MSFS 2024 added native support for way more modern controllers. When the simulator boots, it probes your entire USB bus. If it finds a device with conflicting HID (Human Interface Device) declarations, it either ignores it completely or conflicts with whatever legacy driver is still sitting around. Your yoke appears in Device Manager but shows an error code — or just sits there, unresponsive, like it’s dead.
Third — probably should have opened with this section, honestly — many people have old driver versions cached deep in their registry. Windows doesn’t fully remove these during uninstall. MSFS finds the ghost driver data and tries to use it. Fails immediately because the actual driver isn’t running.
The fix isn’t complicated. Just methodical.
Step 1 — Uninstall Everything and Start Fresh
You need to remove the Saitek software completely. Not just the checkbox uninstall from Programs and Features.
Go to Device Manager. Right-click the Start button in Windows 11/12, select Device Manager. Look for “Human Interface Devices” and expand it. Find anything labeled “Saitek” or “Mad Catz” — or if you’re unsure, anything that says “Yoke.”
Right-click it. Select “Uninstall device.” You’ll see a checkbox: “Attempt to remove the driver software for this device.” Check that box. Actually do it.
Disconnect your yoke from the USB port. Wait ten seconds minimum.
Now open Registry Editor. Press Windows key + R, type “regedit,” hit Enter. Navigate to:
HKEY_LOCAL_MACHINE\SYSTEM\CurrentControlSet\Services
Look for any folder starting with “Saitek” or containing “yoke” in its name. Right-click, delete. If you see “saiusb” or “saidrv” entries, delete those too. I’m being cautious here because registry editing breaks things if you go wild — delete the wrong entry and you’re troubleshooting something else entirely. If you’re not comfortable with this, skip it. The Device Manager removal alone fixes it about 70% of the time. But if you’ve already tried that and failed, the registry cleanup is where the remaining 30% live.
Restart your computer. Seriously, restart it. Don’t plug the yoke back in yet.
Step 2 — Download and Install the Right Driver Version
This is where most people fail spectacularly. They go to Mad Catz’s website, find the newest driver for “Saitek products,” and install it. That driver was built for Windows 10 and newer controllers. Makes things worse for your Pro Flight Yoke specifically.
You need driver version 1.06.007 or earlier. Not the latest. Old.
Go to Mad Catz’s support page: support.madcatz.com. Search for “Pro Flight Yoke.” You’ll find a drivers section. Look for version 1.06.007. If it’s not there, the community has documented the file — the installer is roughly 45 MB, MD5 checksum ending in “a3f2” if you want to verify you have the right one before installation.
Download it. Don’t install yet. Plug your yoke into the back USB port of your computer — not a front-panel header, not a USB hub. A direct motherboard port in the rear. This matters more than you’d think.
Windows will likely detect it as an unknown device. Let it finish detecting. Then run the driver installer. When it asks where to find hardware, point it to the folder where you downloaded that 1.06.007 file.
Installation takes about ninety seconds flat. It will prompt you to restart. Do it.
After restart, go back to Device Manager. Expand “Human Interface Devices” again. You should see “Saitek Pro Flight Yoke System” with no warning icon — no yellow triangle, no error code. Just a green checkmark or nothing at all.
Step 3 — USB Power and Hub Troubleshooting
Here’s where 60% of remaining failures hide. USB hub power is the culprit.
The Saitek Pro Flight Yoke pulls about 500 mA of current during initialization. Unpowered USB hubs can’t sustain that draw. They’ll power the yoke enough to show up in Device Manager but not enough for MSFS to actually read it. You’ll see the device, but the sim treats it as completely unresponsive — almost like a phantom connection.
If you’re using any USB hub, disconnect it immediately. Connect your yoke directly to a back-panel USB 3.0 port. Test it in MSFS. If it works suddenly, your hub was the problem all along. You need either a powered hub — look for one with its own external power supply, not just USB power — or you need to accept cable clutter for direct connection.
Don’t have an available back-panel port? Try a front-panel port before giving up. Front-panel connectors sometimes have power delivery issues depending on your motherboard, but they’re worth testing.
One more thing that fixed it for me specifically: go into BIOS. Look for “USB Legacy Support” or “USB 2.0 Controller Mode.” Toggle it on if it’s off, or off if it’s on, then test. This forces Windows to re-enumerate your USB devices using an older protocol that your yoke understands.
Find BIOS settings during boot — usually by pressing Delete, F2, or F12 depending on your motherboard manufacturer. It’s in a menu called Integrated Peripherals or Onboard Devices. Most manufacturer manuals will tell you which key.
Still Not Working — Should You Upgrade
If you’ve done all three steps and your yoke still isn’t responding in MSFS, you’ve invested two hours into this. It’s worth asking whether the hardware is actually end-of-life.
The Saitek Pro Flight Yoke is genuinely good hardware — don’t get me wrong. But it’s from 2013. If you’re considering alternatives, the Honeycomb Alpha runs $300 and works flawlessly with MSFS 2024. Virpil’s WarBRD yoke is $650 but built to last another decade. The TCA Captain Yoke from Thrustmaster comes in at $250 and already has native MSFS support baked in.
That said, if the three steps above work — and they do for most people — you’ve got a fully functional yoke for zero dollars. Your hardware keeps flying.
I’m apparently one of those people who sticks with gear that works, and this yoke still works for me. No regrets whatsoever.
“`


Stay in the loop
Get the latest ultimate flight simulators updates delivered to your inbox.